Tutorial: Creating a Non-Salary Cost Transfer Journal from an Import File
This tutorial will show you how to use some basic features of JET to create a new non-salary cost transfer journal (NSCT or a JR journal).
We assume that you have an existing text file with NSCT transactions in it that will be used to get imported transactions. This
tutorial will not cover manual entry except for error corrections. We also assume that you are already running JET and have logged in.
Step 1: Create a new Journal
The first step in any JET process is to create a new journal to record transactions within:
- From the File menu, select New Journal. A dialog box similar to the following will appear:
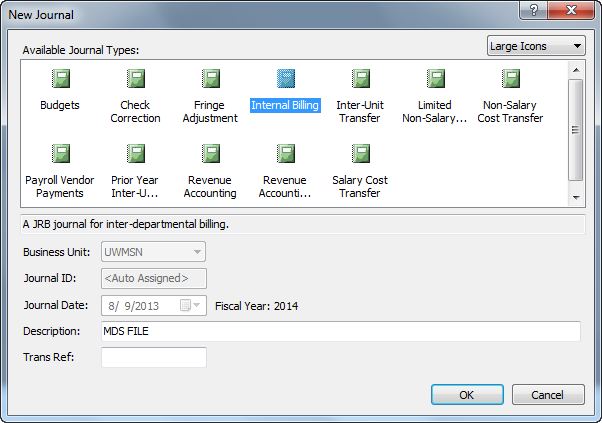
- In the New Journal dialog box, select "Non-Salary Cost Transfer" from the available journal types box.
- Ensure business unit is set to the unit you desire (the default is based on your login) for example, UWMSN is UW-Madison.
- Enter a description for the journal (30 chars) if desired and a trans ref number (5 chars) if desired.
- Click OK. JET will then begin processing your request and prepare the entry
grid.
Step 2: Import Transactions
You will now open a file containing transactions in the NSCT Text File format and import them into the new journal:
- From the File menu, navigate to Import. A sub-menu will appear that lists the available import file types for your journal.
From this sub-menu select NSCT Text File.
- In the Import File dialog that appears, navigate to the folder on your PC or network share that contains the file you
want to import. After selecting the file, click OK.
- After successful importing, you will now see all of the journal lines in your main grid view.
Step 3: Validate and Prepare for Processing
In this step, you manually perform validation of your journal to prepare it for upload:
- The first validation will be accounting edits. Click the Edit Journal button on the task pane to initiate edits. Depending
on the size of your journal, this may take a few minutes.
- If any edit errors were found, they will appear in the error list below the main grid. You can double-click an error in this
list to go-to the line that has the error. Lines can have multiple errors. You must now correct errors. You can do this by
clicking on a cell and editing its value to a correct value. To aid in finding chartfields for a given department ID or project ID,
you may want to use Chart of Accounts. Click the Edit Journal button again to re-check the error lines and validate the journal.
If you cannot correct these errors yourself, consider saving the journal to a .jet file (choose Save from the File menu). You can
then email this file to a person to correct the errors from your favorite email program as an attachment.
- Once you have finished correcting errors, you can now run a balance check. Click the Balance Check button on the task pane to
run this check. If you have an unbalanced journal, you will be alerted to this fact with the error list. You must balance the
journal by adding, changing or removing transactions.
Step 4: Submit the Journal
You will now submit the journal to SFS staging. After a successful nightly batch run, the journal should appear in SFS the following
morning and will also be available in WISER:
- Click the Submit To SFS button on the task pane.
- A series of checks will occur to do more automated checking. If any check fails, you will be alerted and you must
correct the stated error(s).
- Once the checks have completed, the journal will start to upload to the database. When it is done, you will receive
a confirmation message box.
- At this point you can Save the journal for archival purposes using the File | Save menu option or simply exit the program.
If you attempt to exit JET without saving, you will receive a warning about saving the file. You should save the file if you
desire to any location you specify.
- The next day, you should see the journal in SFS/WISER. You can also check the status of the journal using the Check Status
menu option from the Journal menu. This will prompt you for a journal ID, a business unit, and journal date and tell you
where the journal is with regard to the posting process.