Journal Entry Tool User Guide
This documentation will guide you through the Journal Entry Tool application (JET). JET is an application that allows you to enter accounting transactions and upload them to the Shared Financial System (SFS). Transactions are recorded in journals that can be uploaded to the SFS system where they will move through the SFS posting process and eventually end up in WISER as well. JET will ensure that all transactions are valid (meaning that they pass accounting edits and other validations) and it will ensure that the journal you prepare is correctly balanced.
Supplementary User Guides
Import File FormatsCreating a Non-Salary Cost Transfer Journal from an Import File
JET Basics
JET consists of a main window and a number of other window panes that are important to become familiar with. In the center of the window you will see the entry grid where the journal will be displayed. To the right of the entry grid is the Task Pane. This pane is resizable and gives you quick access to some important operations that you can perform on a journal. It also conveys important information about a journal such as its GL journal ID and the status of a currently running operation (such as an upload). To the bottom of the entry grid is the Errors List Pane. This pane is also resizable and will show the current errors that a process (such as edits) has returned about your journal.
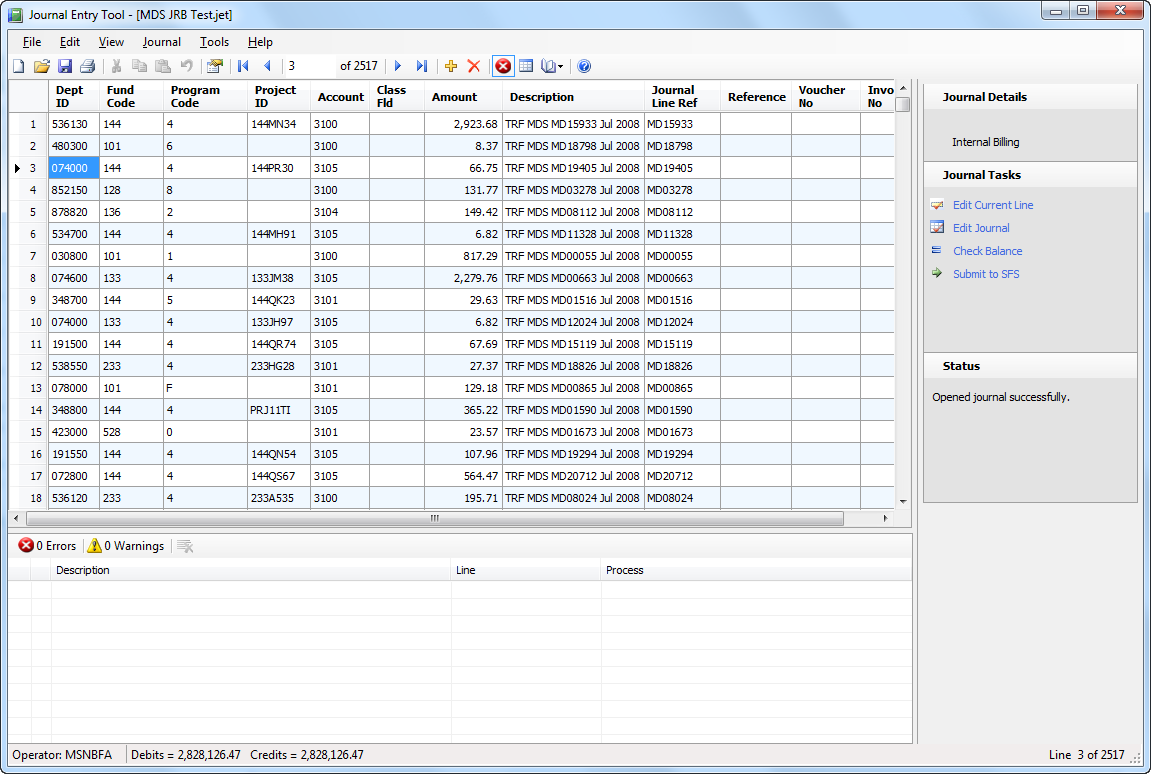
At the very top of the main window is the menu bar. This acts exactly like any Windows application's menu. Program commands are stored in the menu drop downs. Some commands can be invoked by a keyboard shortcut (such as CTRL+S to save a document). Directly beneath the menu bar is the toolbar which provides icons that are buttons for quick access to menu commands. Like a keyboard shortcut, these can help save you time looking through a menu for a command. If you are unsure what a toolbar button does, hover over it to get a tooltip explaining what it is. At the very bottom of the main window is the status bar. This shows your current operator or user name that you are running from. It also shows the current line number you are on within your journal.
Creating Your First Journal with JET
Now that you've launched JET, you're ready to create your first journal. You can use JET to enter journal lines (transactions) or you may be able to import a file from another source into JET. This example will cover manual entry only. Please see a supplementary section on importing.
Create a New Journal
To create a new journal in JET, you can access the New Journal command in the File menu (as a shortcut you can press CTRL+N or click the New Journal toolbar button
 ). The New Journal dialog box will pop-up prompting you for information. The available journal types are listed in a box at the top of
the dialog (i.e. Non-Salary Cost Transfer). Each journal type corresponds to specific rules for that journal. For example, a non-salary cost
transfer journal always begins with a "JRT" prefix and contains internal transfer transactions within a business unit. The New Journal dialog will
also ask for a business unit, journal date, journal header description and trans ref number. You can enter information for the description and trans ref number. You can always
go back and change these description fields at any time before the journal is submitted to SFS.
). The New Journal dialog box will pop-up prompting you for information. The available journal types are listed in a box at the top of
the dialog (i.e. Non-Salary Cost Transfer). Each journal type corresponds to specific rules for that journal. For example, a non-salary cost
transfer journal always begins with a "JRT" prefix and contains internal transfer transactions within a business unit. The New Journal dialog will
also ask for a business unit, journal date, journal header description and trans ref number. You can enter information for the description and trans ref number. You can always
go back and change these description fields at any time before the journal is submitted to SFS.
If your business unit allows, you can also set the journal ID and date, otherwise, the fields are set automatically by JET. Automatically assigned journal IDs are unique. You may also be able to change the business unit (accept in the case of an inter-unit transfer journal) if you have the appropriate authorizations. This would allow you to post journals to other business units other than your primary. If you do switch the business unit, you must abide by that business unit's rules for journal ID and date assignment. In the special case of inter-unit journal transfers, your primary business unit will dictate the rules regarding auto assignment of journal ID and date.
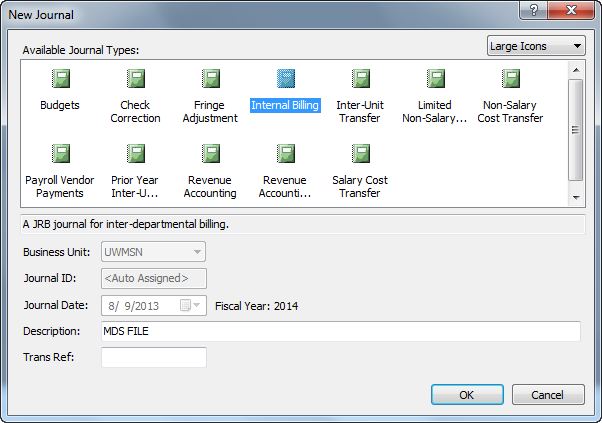
After you press OK, JET will create a new valid GL journal ID for your journal and set up a template for your work. The journal has no lines and is ready for either manual entry or file import.
Entering Transactions
Now you can start to type in transactions into the main grid. The main grid will always have its last line available for a new row (signified by the asterisk symbol on the row header). Simply click on a cell in this row and start typing the appropriate information into the cell (such as fund, dept ID, etc). To move to the next cell, press TAB. To cancel editing and undo the change to a cell, press ESC. Not all fields are required or applicable so it really depends on the data that you are entering. Here are some editing tips:- To edit a cell, simply highlight the cell by clicking on it and start typing.
- You can use the arrow keys to move from cell to cell or row to row.
- The New Line toolbar button (
 ) will add a new row to the grid and place focus on it.
 - JET sometimes refers to the "current" line - this is indicated by the black arrow on a row header (
 ). The current line
is also the line where the current cell focus is.
). The current line
is also the line where the current cell focus is. - To delete a row, highlight the entire row by clicking on the row header and then press the delete key. You can also
delete a row by clicking the delete row
toolbar button (
 ). This button deletes the current row.
 - All fields in JET are uppercased automatically, so you don't need to press shift or caps lock.
- To rearrange columns, click a column header and hold and drag to its new position to the right or left of its current position. The new arrangement will be preserved across application uses.
- To hide or show columns, use the Choose Columns command from the View menu. This will give you a dialog enumerating all possible columns. Check on visible columns, check off columns you don't wish to see. The visibility of a column does not affect whether the data will be validated or uploaded but does affect which columns will be exported or printed.
- To jump to a specific line number, type the line number in the text box on the toolbar. This area of the toolbar also gives you VCR-like controls for navigating through the records. All toolbar buttons have a tooltip that will appear to give you help on what it does.
- To make more room to the right and the bottom of the grid, you can hide the task panes and error lists. To hide or show them, look in the View menu. As a rule of thumb, anything affecting the presentation of data or the application itself will be in the View menu.
- To re-arrange rows, click and drag the row header of a row you wish to move and release it on another row above or below. If you hold the SHIFT key while dragging, you can then copy the row instead of moving it. Each field of the row is copied to the new line.
 ).
Your choice will be saved across application uses.
).
Your choice will be saved across application uses.
Performing Checks and Validations
After all of your transactions have been entered, you may check them for accuracy. JET will not allow you to upload a journal that contains any of the following problems:- Accounting Edit errors. These are based on chartfield and combo edit requirements that ensure that your chartfields are proper alone and as a set.
- Balance problems. Your journal's amount column must sum to zero (or in Journal mode, debits must equal credits).
- DOA account inactivity. Your journal cannot use accounts that DOA (Dept. of Administration) deems inactive.
- Authorization problems. You may not be able to record transactions for protected departments, depending on your privileges.
- Other journal specific problems. Some journal types may not allow you to do a certain action. These are specific to the journal type itself.
Doing a balance check involves the same procedure as the edits, except you click the Balance Check button on the Task Pane (also available from the Journal menu). If there is a problem with the balancing of the journal, an error will appear in the error list. The error message is not associated with any particular line, so no goto-error functionality is supported. The error will however identify whether the journal is unbalanced on the debit or credit side and indicate how much it is unbalanced. That may be a clue as to what to fix.
Submitting the Journal
Once the journal has completed all validation steps, it can be uploaded to SFS. Click the Submit to SFS button on the Task Pane (or the Submit to SFS menu command in the Journal menu) to start this process. This process will first ensure that you have followed all of the previous steps correctly (Note: it is valid to click the submit button at any time. The validation checks will occur regardless of whether you specifically invoked them or not). If any errors are still pending, the process will halt and wait for you to fix them and press Submit again to restart.The submit process will upload batches of journal lines until all are written to the database at which time a finalizing step will occur. Once that step completes, the journal will have been successfully submitted and you will receive a confirmation message.
At any point in the previous steps, you may save the journal by choosing Save from the File menu (or CTRL+S). Saving a journal refers to storing your current work in a .jet file. Jet files are the native file format to JET and are not intended to be read by any other application other than JET. This format is to JET what .DOC or .XLS is to Microsoft Office. If you need to suspend your work on a journal, saving to your local disk is a good idea to prevent loss of data. Jet files also allow you to share a work-in-progress journal with another user. Since this is just a regular Windows file, it can be placed on a network drive or attached to an email. If another user opens the file, they will assume control of the file and become the operator. JET prevents two of the same exact journal from being uploaded, but it is important that your office has workflow policies for JET when it comes to sharing .jet files and performing uploads.
You can also at any point print a journal by using the Print command from the File menu (or CTRL+P). Print Preview is also available to view what it will look like when printed. In order to see edit errors on a report, you must run edits first and they must be visible in the Errors List window pane in order to be printed out.
Once you have finished your work with JET, you can exit the application by choosing the Exit menu option from the File menu or by clicking the standard window close button on the window. If you have not saved the journal to a .jet file, you will be prompted to do so if you wish. You should close JET when you are finished with it to prevent any unauthorized use of the application, especially if you share your PC with other unauthorized users.
Importing Files
Often you will have a file that contains transactions that came from another system or perhaps were entered in Microsoft Excel. JET can import some of these files if they are in recognized formats. Importing is performed after a new journal has been created. Importing is similar to opening a file in any Windows application. Use the Import menu (under the File menu) and its sub-menu choices to import files into JET. The importers available to you depend on the journal type. For non-salary cost transfer journals, two importers are available: the NSCT text file importer and the NSCT Excel file importer.NSCT Text files are flat files that are usually computer generated by external billing systems in preparation to be uploaded to SFS. These files have a fixed length line per transaction and fixed column inputs on each line. NSCT Excel files have a similar layout but they use Excel rows and cells to delimit data. Consult the file format specifications if you are interested in generating these file types for importing to JET. JET can import Excel XLS or XLSX files.
If you have access to these file types (meaning that the file is on your PC or accessible through your PC via a folder share), you can import the file(s). After creating a new journal, simply navigate to the File menu and choose the appropriate importer for your file type from the Import menu. You will be presented with a file open dialog box similar to other Windows applications you may already use. Choose the file you want to import and press OK. JET will then read the file and extract all transactions from it. If there is any problem with the file at all, JET will issue an error message and halt the import. You must fix the file before importing is possible [Note: JET importers are quite robust and will try to import even if the file isn't 100% correct, but this is not always possible.]. After importing a file, you are free to add or change lines or proceed to validation and submission steps. You may notice that JET importers trim and uppercase all fields and so your source data may change a little.
Importing a source file will append the imported rows to your current journal. This will allow you to combine data from two different files into one journal and/or add imported rows from a file to a series of manually entered lines.
Using Chart of Accounts
In order to help you enter and correct transaction funding, JET provides a tool called Chart of Accounts (COA) that provides insight to the proper funding for a transaction. The Chart of Accounts represents the proper chartfield combinations for the SFS general ledger. Specifically, the COA will show Fund Code, Dept ID, Project ID, and Program Code combinations.You can choose to open the Chart of Accounts from the View menu (or press CTRL+SHIFT+C or use the toolbar button
 to toggle it). COA
is another window pane in the application similar to the Task Pane or Errors List.
to toggle it). COA
is another window pane in the application similar to the Task Pane or Errors List.

Once the COA is open, you can put focus on any transaction line in your journal and the valid fund code, dept ID, project ID, and program codes for the line will appear in the COA window's main grid. In order to narrow down to the appropriate combinations, the dept ID or project ID entered on your line will be used as a filter. If project ID has been entered on your line, it will override department and provide valid combinations for the project in the COA window. If project ID is blank and dept ID is entered, dept ID will then be used. If neither dept ID nor project ID is used, COA will not report any data. As you move from line to line in the grid with the COA open, it calculates the correct combinations for the line you are on. To turn off COA, use the same procedure you used to turn it on (the View menu option for it acts as a checkbox-like toggle).
COA also provides two handy buttons that can get the proper funding into your grid. The Copy to Current Line button will take the selected COA row and copy that funding into the current line on your grid. The Copy to New Line button will make a new row in your grid and copy the selected COA row to that new journal line. If your dept ID or project ID returns more than 100 combinations, only the first 100 are displayed at this time.
There are currently some limitations with COA:
- Only 100 combinations are returned at any given time. If a chart field value has more than 100, only the first 100 are returned.
- COA is only available to UWMSN journals/lines at this time.
- Large pooling projects such as UWMSN 101A000 do not return any combinations because nearly all deptids are valid combos.
Applying Default Funding
If you edit a journal and get many errors back, you may want to quickly fix them all by assigning every erroneous transaction a funding string that will pass edits. You can do this in one step by using the Apply Default Funding command from the Journal menu. This will present a dialog box asking for a fund code, a dept ID, a program code, and an account code. All fields are required. After pressing OK in this dialog, each line that has an error will be updated with this funding. The original funding will be saved per line in the Original Funding column (this column is available for view from the Choose Columns option in the View menu). The original funding is saved as a single string. If the original funding column is visible, it will appear in print outs of the journal.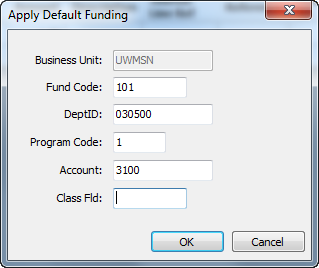
After applying default funding (and assuming it passes edits), you can submit the journal. After the journal has posted to SFS and has been extracted to WISER, it is easy to get a report on it. There are also other ways to query SFS and PeopleSoft for this information.
Adding Cash Offsets
The Add Cash Offsets menu option from the Journal menu can be user invoked to add account 6100 offsets to your journal. Before running this process, however, your journal must already balance to zero. After the process runs, you will see new lines added to the bottom of your journal for account 6100. The lines are a rolled up sum by chartfield combination (not including account) with a line description of CASH. If you do not explicitly add these offsets, JET will add them for you during journal submission. Note: it is a good idea to add cash offsets at the very end of your work before submission - if you haven't run edits and you have erroneous lines, these erroneous lines will be duplicated in the CASH lines and your errors could double! CASH lines just like regular transaction lines must be validated before submission of the journal.Advanced Tools
Under the Tools menu, you will find some tools that will perform an advanced and potentially time-saving function on a journal. JET contains the following built-in tools:- Reverse Journal. This tool will take the journal and reverse all dollar amounts in it (in other words, swap debits and credits). This tool is convenient when you want to make a journal that "backs out" a previous journal line for line. Because this operation impacts the entire journal, you are first asked if you really want to perform this action. A subsequent use of this tool will undo your previous operation.
- New Reversed Line. This tool will take the current line you are working on and create a new reversed line below it. If your current line is a debit, it will create the appropriate credit to balance the previous line and vice versa. Only the descriptive columns of the previous line are copied. It is assumed that you will provide the funding fields yourself. This tool has a convenient keyboard shortcut (CTRL+R).
Application Options and Customizations
There are a few aspects of JET that can be customized and saved across application usages. The Options dialog available from the Tools menu allows you to adjust a few of these options.The Grid Tab
Here you can customize how the grid looks on your version of the application. The following options can be set:- Grid Lines - choose Single for a true grid, SingleVertical for vertical lines only, SingleHorizontal for horizontal lines only or None for no grid lines at all.
- Background Colors - you can choose from a preselected list of colors how the lines in your grid will appear.
- Font Colors - you can choose from a preselected list of colors how the fonts/text in your grid will appear.
- Show Line Numbers - check "on" to see a number on every row header, check "off" to see nothing.
The Printing Tab
Here you can setup print options and how the pages will appear when you print a journal. The following options can be set:- Include Page Numbers - check "on" to see page numbers at the top of each printed page.
- Include title - check "on" to see the journal's title (the GL journal ID) at the top of each printed page.
- Orientation - select either portrait or landscape paper orientation.
- Margins - adjust the paper margins in inches or fractions of inches. Margins can be up to 3in.
Other Application Options
Each time you close JET, the application will save all your options so that the next time you use the application, it will remember your choices to provide a better customized experience for you. The following items are saved:- All user options from the Options dialog box.
- Main window layout, position, size, and maximized states.
- Whether the errors list, task pane, or chart of accounts is visible or not and their sizes.
- Your editing View mode selection (Transaction or Journal).
- Your current column layout, positions and visibilities.
- The last accepted default funding source you inputted into the Default Funding Dialog.
Appendix A: JET Requirements
In order to run JET, you will need to meet the following hardware and software requirements:- Windows 10.
- .NET Framework 4.7.2 or later (Note: Windows 10 May 2018 update or later ships with this, otherwise, install will require admin rights).
- A valid WISER account with JET privileges (data view account name and password).
Appendix B: Menu Command Reference
This section will explain what each menu and toolbar command does within JET. After each menu name, if there is a keyboard shortcut, it is listed in parentheses.File Menu
- New Journal (CTRL+N) - this invokes the New Journal dialog box and is the first step to creating a new journal. The New Journal dialog will ask for a journal type, and some basic journal header information. You will be prompted to save any current work before this command is invoked.
- Open (CTRL+O) - this opens the Open JET File dialog asking for a .jet file name to load from. This is a standard Windows file open dialog. You will be prompted to save any current work before this command is invoked.
- Import - this is the menu header for a submenu which lists all possible importers for the current journal type. This menu command is not available until a new journal has been created (in order to establish journal type). The sub-menu to the right of this command will list each possible importer. Each importer opens the Windows file open dialog box that will prompt you for a file to import. If no importers are available for your journal type, this command will be disabled.
- Save (CTRL+S) - this will save the current journal to a .jet file. If you are invoking this command for the first time since creating a journal, you will be prompted for a file name. Subsequent save commands will use the previous file name to save the file (overwriting the previous copy).
- Save As - this saves the journal to a new .jet location and begins a new save filename. Use this command to save a copy of the journal to a different .jet file.
- Export - this command opens a submenu that shows available exporters. An exporter is different from a save because it translates the journal from the native format to the format of the exporter. For example, the Excel exporter is intended to give you an Excel XLS document that represents your current view of the journal.
- Print Preview - this command will show a dialog that will generate a preview of the journal when printed. Use this command to see a printout before going to paper.
- Print (CTRL+P) - this command will open the standard Windows print dialog where you can submit a print job to any printer installed on your PC.
- Exit - exits the JET application. You will be prompted to save any pending work.
Edit Menu
- Undo (CTRL+Z) - if possible, the last operation performed on the grid can be undone. Not all operations are undoable.
- Cut (CTRL+X) - when editing values in the entry grid, you can select text and cut it to the clipboard with this command.
- Copy (CTRL+C) - when editing values in the entry grid, you can select text and copy it to the clipboard with this command.
- Paste (CTRL+V) - pastes any text on the clipboard to the current cell being edited.
- Delete Current Line (CTRL+SHIFT+DEL) - deletes the current line from the grid. This command can be undone.
- Clear All - clears all lines in the entry grid. Since this command cannot be undone, you must confirm your intentions.
- Insert Line (SHIFT+INS) - inserts a new blank line at the current line position. This command can be undone.
View Menu
- Task Pane (CTRL+SHIFT+T) - toggles the Task Pane.
- Errors List (CTRL+SHIFT+E) - toggles the errors list pane.
- Chart of Accounts (CTRL+SHIFT+C) - toggles the chart of accounts pane. If you have a selected line in the entry grid, that line's chart of accounts will be loaded.
- View Mode - this command opens a submenu that allows you to toggle between Transaction mode (single amount column) or Journal mode (two amount columns for debit and credit).
- Single Line View (CTRL+SHIFT+R) - this will open the single line view dialog. This dialog is floating which means that the dialog will stay open while you work in either the main window or in itself. It provides a synchronized top-down view of a line that can be good for hand editing work when the grid is too large or cumbersome. This dialog remains open until you close it with the close button.
- Choose Columns - this command opens the choose columns dialog that allows you to set column visibility. Use this dialog to set up how columns appear in online view and in print outs and exports.
Journal Menu
- Edit Current Line - this command will run accounting edits on the current line. If there is no current line, this command is disabled.
- Edit Journal - this command runs accounting edits on every line in the journal. This can create a long running process and so status is reported in the task pane. You can cancel this process by clicking the cancel button in the status area of the task pane while it is running. If there are no lines in the journal, this command is disabled.
- Apply Default Funding - this command will invoke a dialog asking for information about funding you wish to apply to rows that have errors. Only after edits have run and there are errors will this command be available.
- Check Journal Balance - this command will check to see if the journal is balanced (amount columns balance to zero). If this process fails, an error is posted in the errors list pane.
- Add Cash Offsets - this command will add cash 6100 account offsets to the end of the journal. It is a best practice to run this command last just before submission in order to reduce edit checks.
- Submit to SFS - this command will start a series of checks to ensure that the journal is valid and then will begin uploading the journal to the SFS journal lines table. This command must re-check edits (although it checks only the lines that have not yet passed edits) and balance check amongst other things. If any of these re-checks fail, the submit process is halted and you must fix any errors.
- Check Status - this command will open a dialog allowing you to find the status of any given journal. If you are working with a journal, that journal's attributes are loaded into the dialog allowing you to click Check to see its status. You can also enter the attributes yourself to check the status of any journal. You must enter a business unit, a GL jrnl ID, and a journal date to get a status. The status conveys whether the journal has been created in the SFS environment, whether it is pending, or posted. This status can also convery whether the journal is in WISER or not.
- Properties - this command will open a dialog that allows you to change the header properties of a journal such as its description and trans ref number. This information is carried into SFS upon successful submission to SFS.
Tools Menu
- (Tool Snap-ins) - this isn't a command but a placeholder for the various tools that are available to the user. Many of these tools are dependent on the current journal type so this documentation cannot enumerate all of them. In general, a tool "snap-in" is a simple routine that can work on a journal or a journal line. For example, the New Reverse Line tool takes the current journal line, reverses the transaction amount and makes a new line beneath it. It is a handy tool for quickly making a new line that has the exact same dollar amount as the previous line but credited or debited appropriately. Many tools have quick keyboard shortcuts that can make you much more productive.
- Options - opens the options dialog where you can set application preferences and options.
Help Menu
- Contents (F1) - opens your default web browser to show this documentation.
- Check for Update - checks the server for a new version of JET that can be downloaded. You will have the option to download and install the update right from within JET. This update check also runs each time you start JET. You should always use the most-recent version of the software.
- Test Connection - tests to ensure that you can connect to a JET web server. This is for diagnostics purposes only.
- About - displays program title, version, and copyright information.
Appendix C: Toolbar Reference

Each element left to right is defined as:
- New Journal - same as the File | New Journal menu command.
- Open - same as the File | Open menu command.
- Save - same as the File | Save menu command.
- Print - same as the File | Print menu command.
- Cut - same as the Edit | Cut command.
- Copy - same as the Edit | Copy command.
- Paste - same as the Edit | Paste command.
- Undo - same as the Edit | Undo command.
- Journal Properties - same as the Journal | Properties menu command.
- First Line - moves the current line marker to the first line of the journal.
- Previous Line - moves the current line marker back one line, if possible.
- Go to Line - type a line number in the text box to go to that line.
- Next Line - moves the current line marker to the next possible line.
- Last Line - moves the current line marker to the last possible line before the new line row.
- Add New Line - adds a new line to the journal and places focus on that line.
- Delete Line - deletes the current line immediately.
- Errors List View Toggle - toggles on or off the visibility of the errors list window pane.
- Chart of Accounts View Toggle - toggles on or off the visibility of the COA window pane.
- View Mode - has a mini-drop down menu that allows you to select Transaction or Journal mode view.
- Help - same as Help | Contents menu command.